Mastering the Art of Makeup: A Step-by-Step Guide to Achieving Your Desired Look
Related Articles: Mastering the Art of Makeup: A Step-by-Step Guide to Achieving Your Desired Look
Introduction
With enthusiasm, let’s navigate through the intriguing topic related to Mastering the Art of Makeup: A Step-by-Step Guide to Achieving Your Desired Look. Let’s weave interesting information and offer fresh perspectives to the readers.
Table of Content
Mastering the Art of Makeup: A Step-by-Step Guide to Achieving Your Desired Look

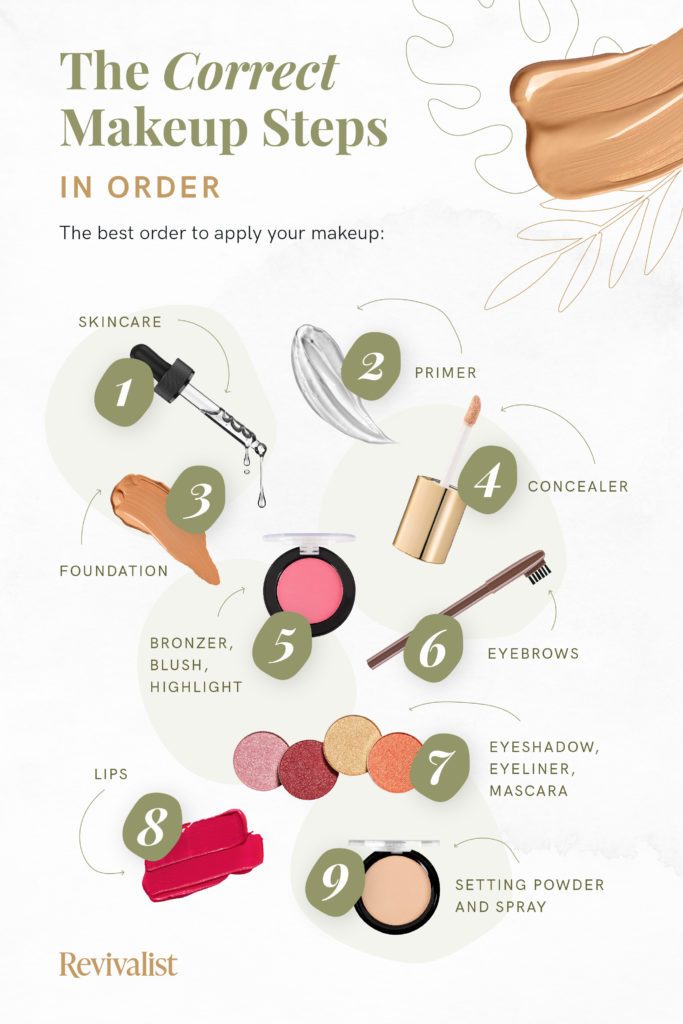
Makeup, a form of artistry applied to the face, serves a multitude of purposes. From enhancing natural features to creating dramatic transformations, makeup allows individuals to express their creativity and personal style. While the application process may seem daunting at first, understanding the fundamental steps and techniques can empower anyone to achieve desired results. This comprehensive guide explores a step-by-step approach to makeup application, providing insights into each stage and offering valuable tips for optimal outcomes.
1. Preparation: The Foundation for Flawless Makeup
Before embarking on the makeup journey, proper preparation is paramount. This involves cleansing, exfoliating, and moisturizing the skin, creating a smooth canvas for makeup application.
Cleansing: This step removes dirt, oil, and impurities, ensuring a clean base for makeup. Choose a cleanser suitable for your skin type, whether oily, dry, or combination. Gentle circular motions are recommended, followed by thorough rinsing with lukewarm water.
Exfoliating: This process removes dead skin cells, revealing smoother, brighter skin. Exfoliate 1-2 times a week, using a gentle scrub or chemical exfoliant. Avoid excessive scrubbing, as it can irritate the skin.
Moisturizing: Hydration is crucial for maintaining skin health and creating a smooth makeup application. Apply a moisturizer suitable for your skin type, allowing it to absorb fully before proceeding.
2. Primer: The Key to Long-Lasting Makeup
Primer acts as a barrier between the skin and makeup, smoothing out imperfections and extending the wear of foundation. It helps to minimize pores, control oil production, and create a more even surface for makeup application.
Types of Primers:
- Silicone-based: These primers create a smooth, silky surface, ideal for minimizing the appearance of pores and fine lines.
- Water-based: These primers provide a lightweight, hydrating feel, suitable for dry or dehydrated skin.
- Mattifying: These primers help to control shine and absorb excess oil, ideal for oily skin.
Application: Apply a small amount of primer to the face, blending it evenly with fingertips or a makeup sponge.
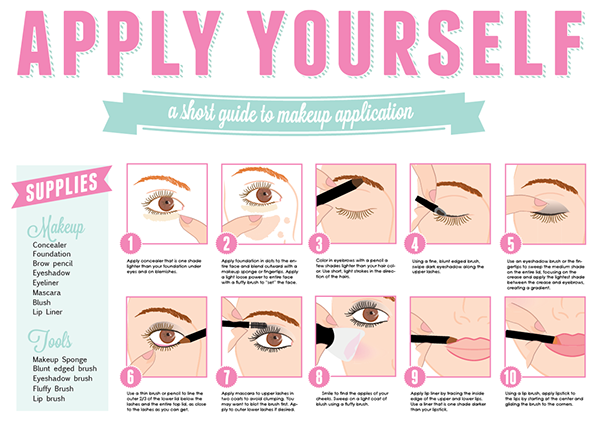
3. Foundation: The Base for a Flawless Complexion
Foundation provides an even skin tone, concealing blemishes and imperfections. It comes in a variety of formulas, from lightweight to full coverage, allowing for customizable coverage.
Choosing the Right Foundation:
- Skin Type: Consider your skin type when selecting a foundation. Oily skin may benefit from a mattifying formula, while dry skin may prefer a hydrating option.
- Undertones: Identify your skin’s undertones (warm, cool, or neutral) to ensure a perfect match.
- Coverage: Determine your desired level of coverage, ranging from sheer to full.
Application Techniques:
- Fingers: This method provides warmth and helps to blend the foundation seamlessly.
- Makeup Sponge: This tool offers a more precise application, minimizing streaks and blending the foundation evenly.
- Foundation Brush: This brush is ideal for creating a flawless, airbrushed finish.
4. Concealer: Targeting Imperfections and Brightening
Concealer is used to cover blemishes, dark circles, and other imperfections, providing targeted coverage. It comes in various shades, from light to dark, allowing for precise color correction.
Choosing the Right Concealer:
- Skin Tone: Select a concealer shade that matches your skin tone or is one shade lighter for brightening.
- Coverage: Choose a concealer with the appropriate level of coverage, from sheer to full.
- Formula: Consider the formula, whether cream, liquid, or stick, based on your preference and skin type.
Application Techniques:
- Triangle Method: This technique involves applying concealer in a triangle shape under the eyes, blending it outwards to brighten and conceal dark circles.
- Dabbing Method: This method involves dabbing concealer onto blemishes or imperfections, blending it out with a brush or sponge.
5. Powder: Setting the Makeup and Mattifying
Powder sets makeup, preventing it from creasing and smudging. It also helps to absorb excess oil, creating a matte finish.
Types of Powder:
- Loose Powder: This type offers a lightweight, sheer coverage, ideal for setting makeup without adding noticeable color.
- Pressed Powder: This type provides a more pigmented coverage, suitable for touch-ups throughout the day.
Application Techniques:
- Brush: Use a large, fluffy brush to apply powder evenly over the face.
- Sponge: This method provides a more concentrated application, ideal for setting specific areas.
6. Blush: Adding Color and Dimension
Blush adds a natural flush of color to the cheeks, enhancing the complexion and creating a youthful glow. It comes in various shades, from soft pinks to deep reds, allowing for customizable looks.
Choosing the Right Blush:
- Skin Tone: Select a blush shade that complements your skin tone.
- Undertones: Consider your skin’s undertones when choosing a blush shade. Warm undertones may prefer peachy or coral shades, while cool undertones may opt for pink or berry shades.
- Formula: Blush comes in powder, cream, and liquid formulas, each offering different levels of intensity and finish.
Application Techniques:
- Brush: Use a blush brush to apply the color to the apples of the cheeks, blending it outwards towards the temples.
- Sponge: This method provides a more concentrated application, ideal for achieving a sculpted look.
7. Eyeshadow: Enhancing the Eyes
Eyeshadow is used to define and enhance the eyes, adding depth, dimension, and color. It comes in a wide array of shades and textures, allowing for endless possibilities.
Choosing the Right Eyeshadow:
- Skin Tone: Select eyeshadow shades that complement your skin tone and eye color.
- Undertones: Consider your skin’s undertones when choosing eyeshadow shades. Warm undertones may prefer warm-toned shades, while cool undertones may opt for cool-toned shades.
- Texture: Choose eyeshadow textures based on your desired finish, from matte to shimmery.
Application Techniques:
- Blending Brush: This brush is essential for creating seamless transitions between shades and blending out harsh lines.
- Crease Brush: This brush is used to apply eyeshadow to the crease of the eyelid, adding depth and dimension.
- Flat Shader Brush: This brush is used to apply eyeshadow evenly across the lid, providing a base color.
8. Eyeliner: Defining the Eyes
Eyeliner defines the shape and contours of the eyes, creating a dramatic or subtle effect. It comes in various forms, from pencils to liquid liners, offering different levels of precision and intensity.
Choosing the Right Eyeliner:
- Eye Shape: Consider your eye shape when choosing an eyeliner. For example, a winged liner may enhance almond-shaped eyes, while a thin line may suit round eyes.
- Formula: Choose an eyeliner formula based on your desired finish and application preference. Pencil liners are easy to apply and blend, while liquid liners provide a more precise and dramatic line.
- Color: Select an eyeliner color that complements your eye color and overall look.
Application Techniques:
- Pencil: Sharpen the pencil and apply it along the lash line, smudging it out for a softer look.
- Liquid: Use a thin brush to apply liquid liner along the lash line, creating a precise line.
- Gel: Apply gel liner with a brush, creating a defined and long-lasting line.
9. Mascara: Lengthening and Volumizing the Lashes
Mascara lengthens and volumizes the lashes, enhancing their appearance and creating a more dramatic look. It comes in various formulas, from lengthening to volumizing, allowing for customizable results.
Choosing the Right Mascara:
- Lash Type: Consider your lash type when selecting a mascara. For example, those with short lashes may prefer a lengthening formula, while those with thin lashes may opt for a volumizing formula.
- Formula: Choose a mascara formula based on your desired finish, from natural to dramatic.
- Color: Select a mascara color that complements your eye color and overall look.
Application Techniques:
- Wiggle Method: This method involves wiggling the mascara wand from the root to the tip of the lashes, creating volume and separation.
- Layering Method: Apply multiple coats of mascara, allowing each coat to dry before applying the next, for added volume and length.
10. Lipstick: Adding Color and Defining the Lips
Lipstick adds color and definition to the lips, enhancing their appearance and completing the makeup look. It comes in a wide array of shades and finishes, from matte to glossy, allowing for endless possibilities.
Choosing the Right Lipstick:
- Skin Tone: Select a lipstick shade that complements your skin tone and overall look.
- Undertones: Consider your skin’s undertones when choosing a lipstick shade. Warm undertones may prefer warm-toned shades, while cool undertones may opt for cool-toned shades.
- Finish: Choose a lipstick finish based on your desired look, from matte to glossy.
Application Techniques:
- Lip Liner: Use a lip liner to outline the lips, creating a defined shape and preventing lipstick from bleeding.
- Lipstick Brush: This brush provides a more precise application, allowing for a clean and even application of lipstick.
- Direct Application: Apply lipstick directly from the tube, blending it out with a finger or brush.
11. Setting Spray: Sealing the Makeup and Ensuring Longevity
Setting spray seals makeup, preventing it from fading or smudging throughout the day. It also helps to create a smooth, airbrushed finish.
Types of Setting Sprays:
- Matte: This type helps to control shine and create a matte finish.
- Dewy: This type adds a subtle sheen to the skin, creating a natural glow.
- Long-Lasting: This type helps to extend the wear of makeup, preventing it from fading or smudging.
Application Techniques:
- Hold the bottle 6-8 inches away from the face and spray in a misting motion.
- Allow the spray to dry completely before touching the face.
FAQs by Makeup Step by Instructions
1. What is the difference between foundation and concealer?
Foundation provides even coverage to the entire face, while concealer targets specific imperfections and blemishes.
2. How do I choose the right shade of foundation?
Test the foundation on your jawline, blending it into your skin. The shade that disappears seamlessly is your match.
3. Can I use eyeshadow as eyeliner?
Yes, you can use a dark eyeshadow with a damp brush as eyeliner.
4. How do I remove makeup properly?
Use a gentle makeup remover and a cotton pad to remove makeup thoroughly.
5. What are the benefits of using a setting spray?
Setting spray helps to seal makeup, preventing it from fading or smudging throughout the day.
Tips by Makeup Step by Instructions
1. Prep Your Skin: Cleanse, exfoliate, and moisturize your skin before applying makeup for a smooth canvas.
2. Use a Primer: Primer helps to minimize pores, control oil production, and extend the wear of makeup.
3. Blend Thoroughly: Blend foundation, concealer, and eyeshadow seamlessly for a natural finish.
4. Practice Makes Perfect: Practice applying makeup regularly to improve your techniques and find what works best for you.
5. Don’t Be Afraid to Experiment: Explore different makeup trends and techniques to find your personal style.
Conclusion by Makeup Step by Instructions
Mastering the art of makeup requires understanding the fundamental steps and techniques. From preparation to application, each stage plays a crucial role in achieving desired results. By following this comprehensive guide, individuals can learn to enhance their natural features, create expressive looks, and unlock their inner makeup artist. Remember, practice makes perfect, and experimentation is key to discovering a personal style that reflects individual beauty and confidence.


Closure
Thus, we hope this article has provided valuable insights into Mastering the Art of Makeup: A Step-by-Step Guide to Achieving Your Desired Look. We thank you for taking the time to read this article. See you in our next article!